Sunday, December 11, 2016

Cherry Chocolate Shortbread Bars

Okay, I know I haven't posted for several weeks but I've been busy with my annual Christmas baking marathon and getting all my other winter and holiday prep done.

I've also been working on a tasty new holiday dessert! The original idea came to me while reading another Hannah Swensen mystery by Joanne Fluke. In the 6th book of the series - "Sugar Cookie Murder", there is a recipe for a "Blueberry Shortbread Bar Cookie" I thought it sounded good but at the time I was also looking for ideas for a dessert to serve to my gal pals at my annual holiday gathering. I decided that cherries might be a bit more in keeping with the festive season. That being said, the additional changes that I made to the original recipe would also work well with blueberry pie filling or an apple pie filling. I just haven't gotten around to trying those versions yet!

Ms Fluke and most professional chefs/bakers disdain the use of block margarine. That is all well and good IF you can afford it! However, in my area, butter runs about $5/pound and occasionally you may find it on sale for about $3/pound with a limit of one or two per customer. Even the sale price is more than I can justify on a fixed income - especially when you consider that 3 pound packages of name brands like Imperial or Parkay often go on sale for $3 to $4 a package and can be stored in the fridge for several months. So, unless you and your guests have very sensitive gourmet pallets you probably won't notice the difference between a good quality margarine and butter in most baking recipes.

It should also be noted that the original recipe seems to indicate that the dough is more of a crumb mixture rather than a soft dough. When I made it, I decided that I'd see if it would go to a soft dough which I felt would be easier for me to work with. Once I got past the crumb stage, it was only another minute or so of light hand kneading and it was a lovely soft dough.

The first time I made the bar, I thought they were good but decided to jazz it up and add some additional flavours. Namely, layers of roasted almonds and bittersweet chocolate! I also brushed the bottom and top layers of dough with a bit of liqueur. I used Grand Marnier but Cherry Brandy or Amaretto would also work well. If liqueur is not your thing, feel free to skip it. The choice is yours.

Well, I've made this recipe three times now and those who've tasted it think it is delicious! Hopefully, you and your guests will also enjoy it!
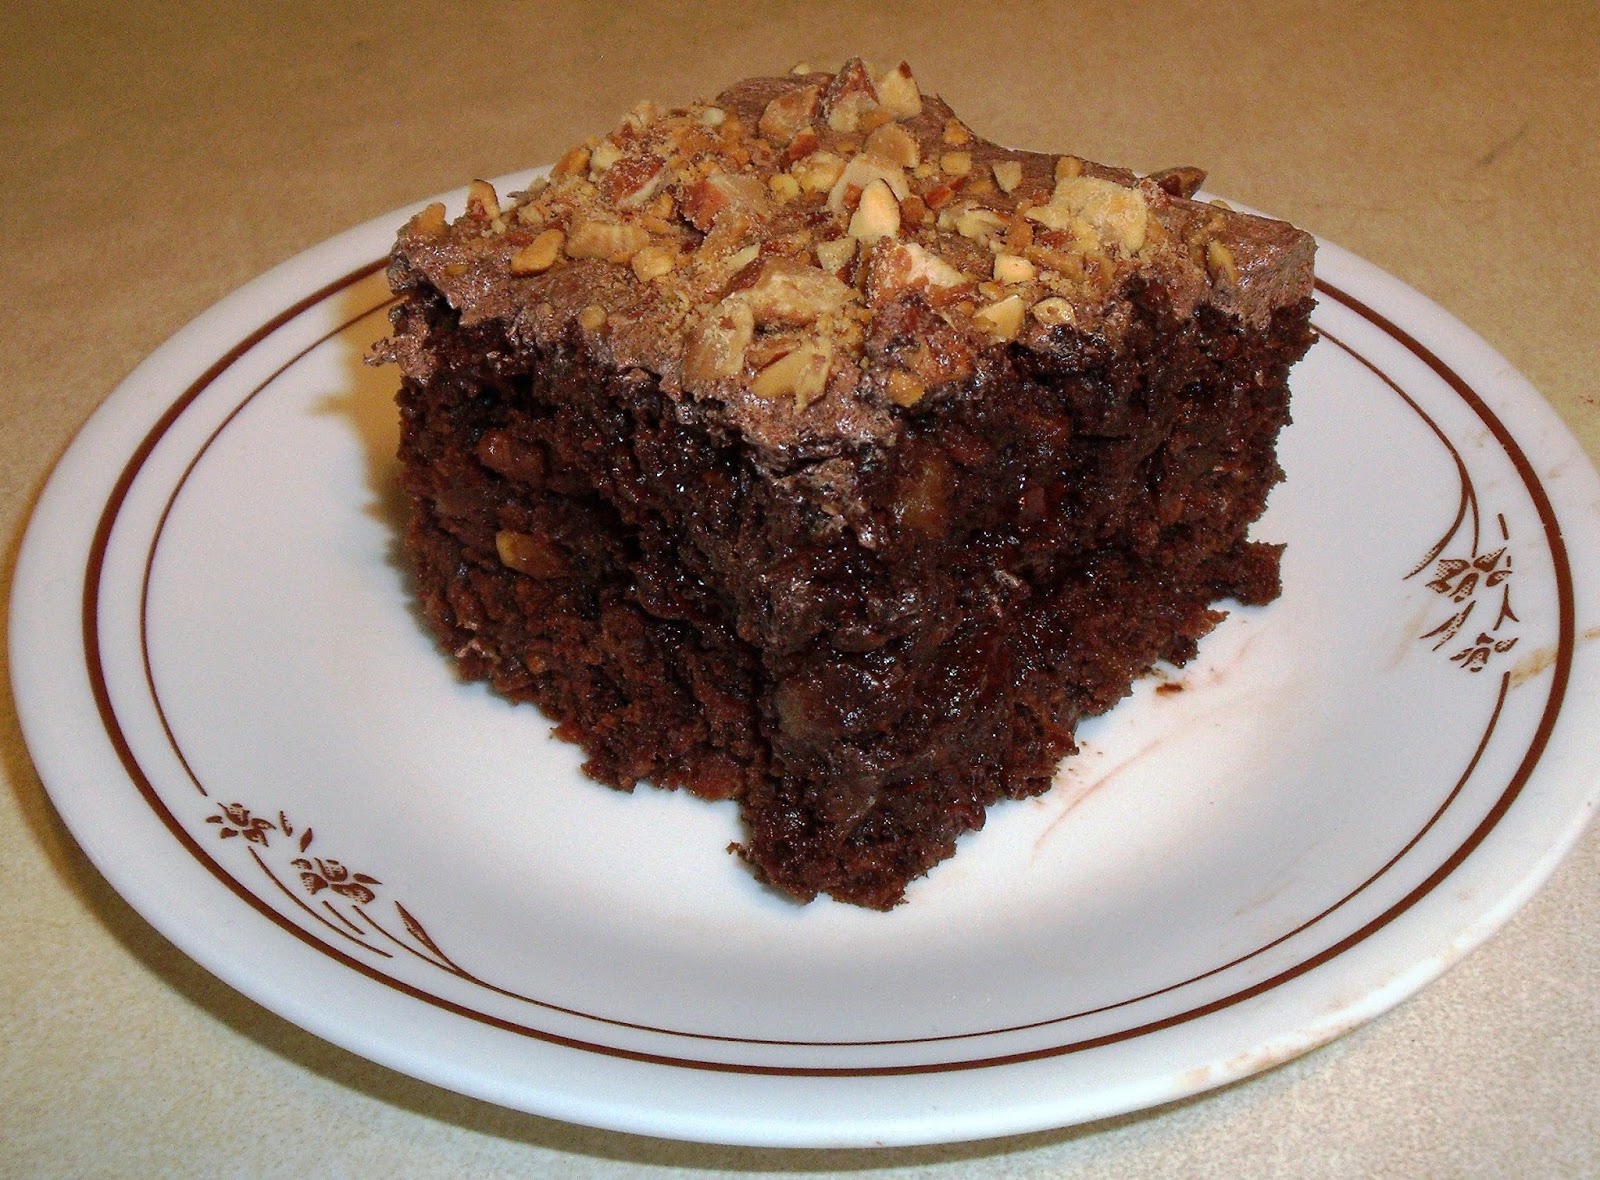
Cherry Chocolate Shortbread Bars

1 cup chopped almonds, roasted
3 cups all purpose flour
1 1/2 cups block margarine, softened
3/4 cup powdered (confectioner’s) sugar
1/4 cup ground almonds
1/8 teaspoon salt
1 can (21 ounces) cherry pie filling
8 ounces (227 grams) chopped bittersweet chocolate
2 Tablespoons liqueur such as Grand Marnier or Amaretto or Cherry Brandy

Preheat oven to 350F, rack in the middle position.

Line a 9 X 13 inch cake pan with parchment paper - so that the paper is up to the top on all four sides.

Cut a length of wax paper, slightly longer than the baking pan. With a marker, trace the bottom of the pan onto the wax paper. This will be a template to stretch out the dough for the top. Set the wax paper aside.
Place the chopped almonds in the parchment lined pan and roast for about 5-7 minutes or till lightly roasted and aromatic. Stir the nuts once or twice to prevent burning. Remove from oven to a cooling rack. When the almonds have cooled, transfer to a small bowl or plate for later.
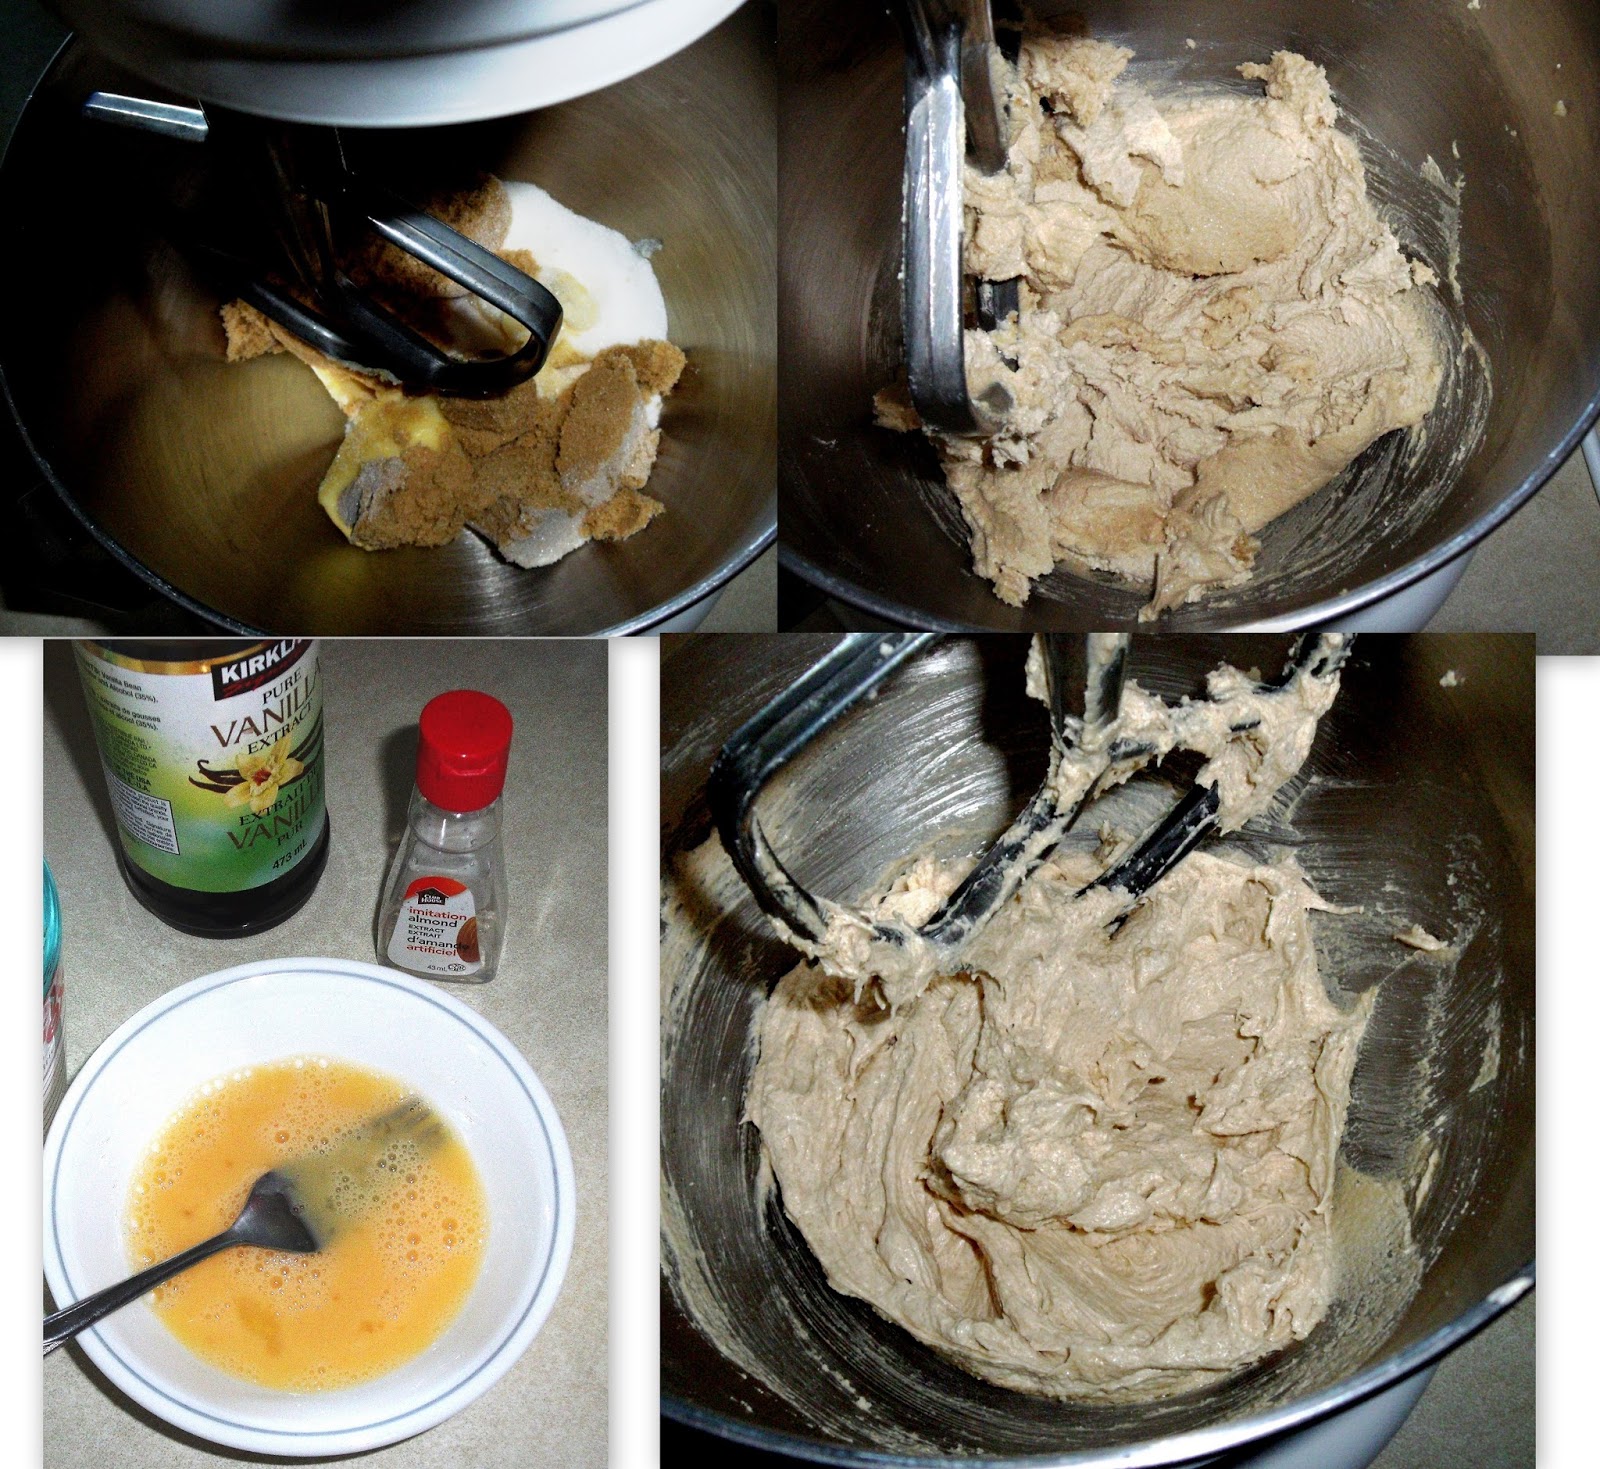
In a large bowl, combine powdered sugar, flour, ground almonds and salt. Cut in the margarine. Mix well - to a soft dough. (Note: I mix the dry ingredients with a fork but once the margarine is added, I use my hands to work it into a soft dough. You can also do this in a food processor using cold margarine cut into chunks, and the steel blade.)
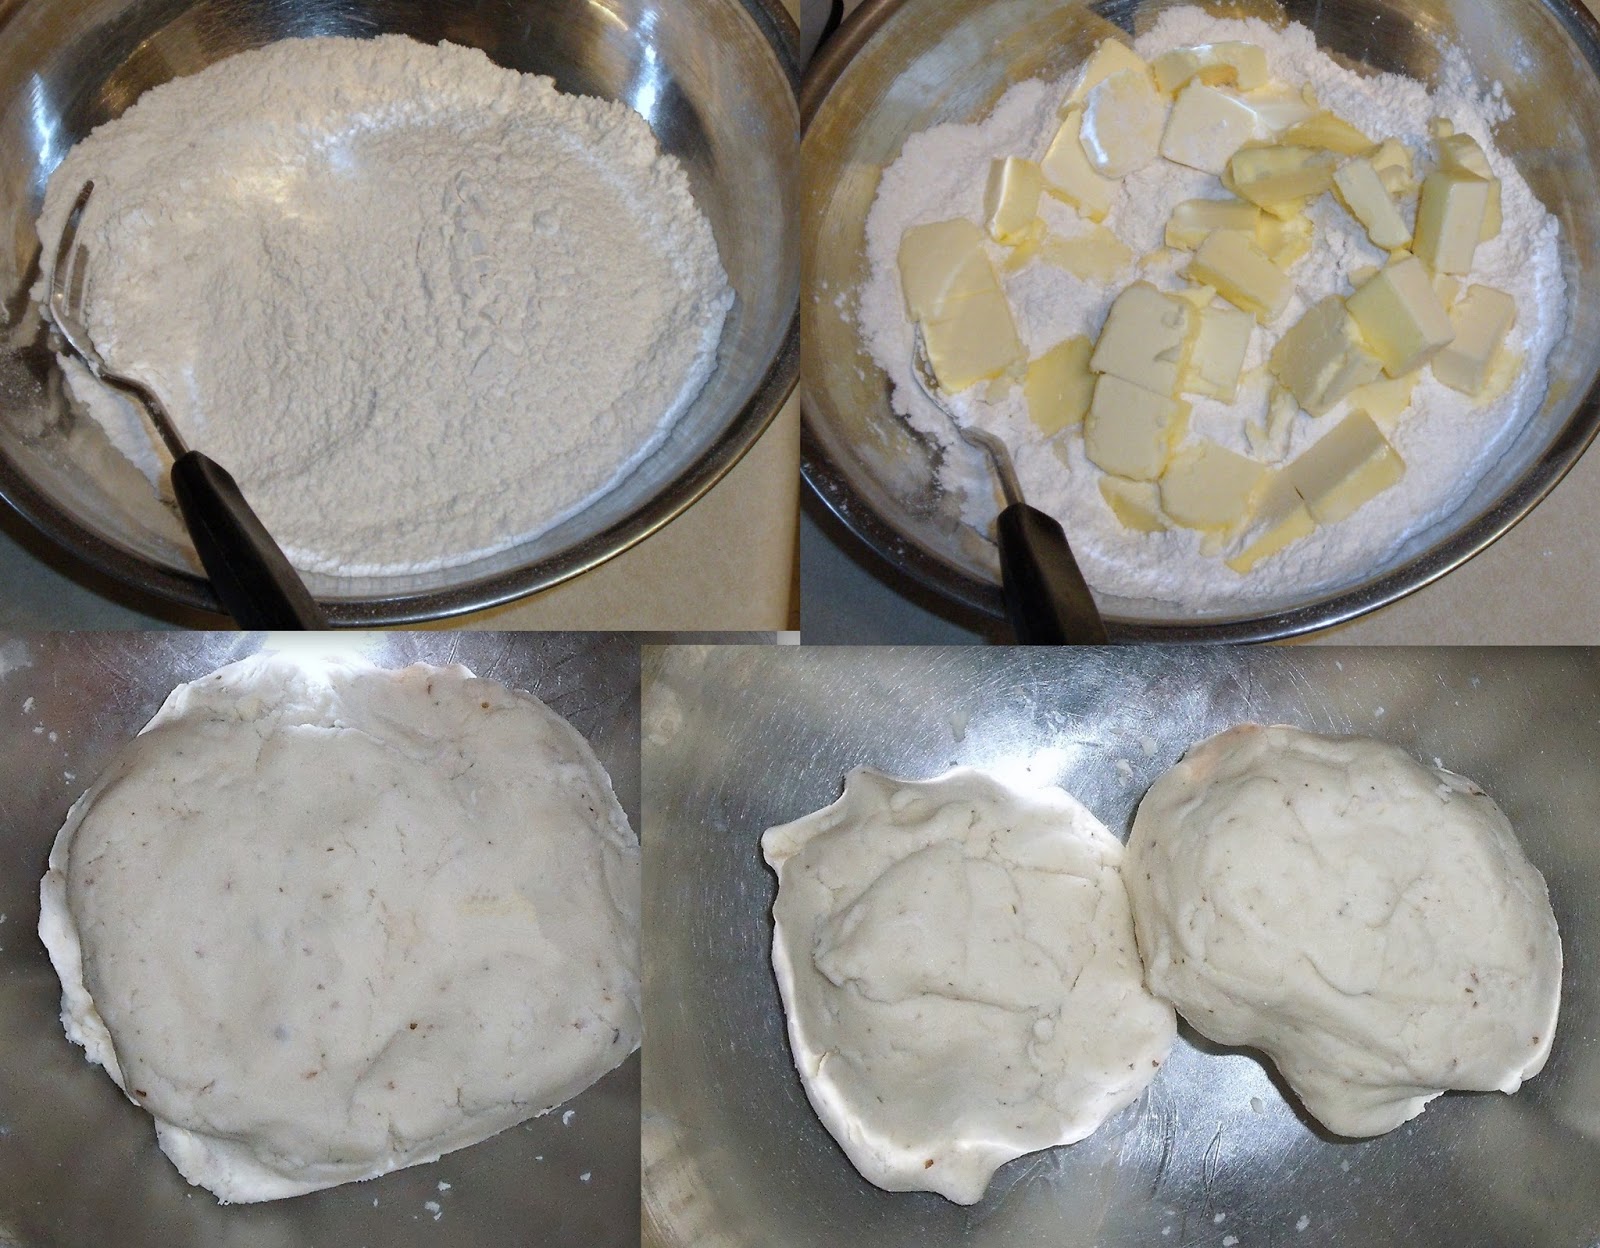
 Divide the dough in half. Place half of the dough into the parchment lined 9 x 13 inch pan. Use your fingers and the palms of your hands to spread the dough evenly in the bottom of the lined pan. Do not press it in too firmly as that will make a tough crust to cut or bite into.

With your fingers and the palm of your hands, stretch out the other half of the dough onto the wax paper template. Set aside.
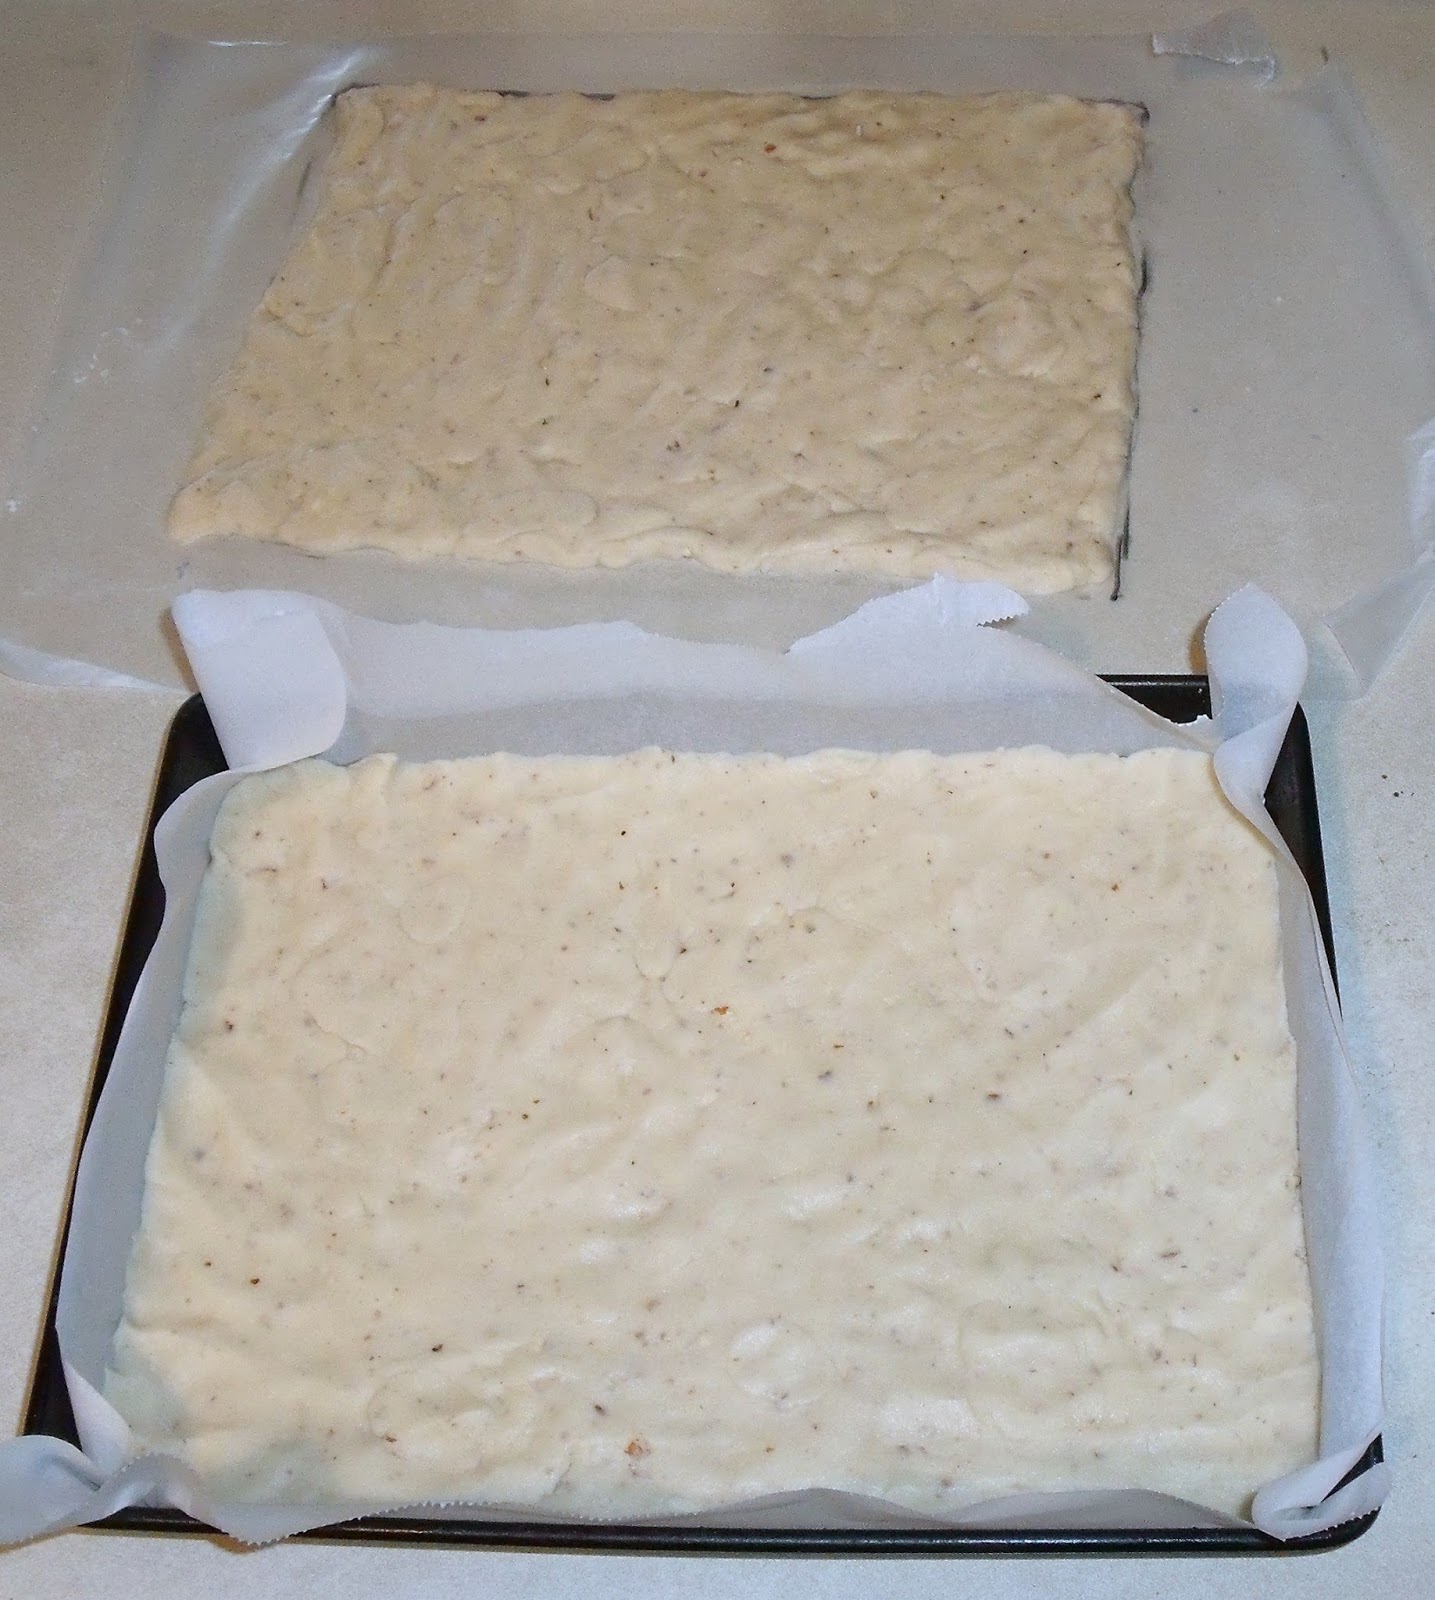
 (Note: I prefer laying out both halves of the dough before baking the base so that I know I've got it fairly even for both top and base)

Bake the base (in the parchment lined pan) at 350F for 15 minutes. Remove the pan from the oven. DON’T TURN OFF THE OVEN!

While the base is baking make sure you have the remaining ingredients organized and ready to go.
 Let the crust cool for 5 minutes.

With a pastry brush, brush 1 Tablespoon of the liqueur over the base.

Sprinkle 1/2 of bittersweet chocolate evenly on the crust. (Don't worry if it starts to melt as the base is still quite warm at this point.)

Sprinkle 1/2 cup of the roasted almonds evenly over the chocolate.

Carefully spoon the pie filling over the top of the chocolate and nuts. (Note: I try to spread the cherries around a bit so they aren't all clumped together.)

Sprinkle cherry layer with the other half of the nuts and then the rest of the chocolate.

Carefully turn the top layer of dough (that is on the wax paper) upside down and place it so the dough is lying directly over the final layer of chocolate. Peel the wax paper off. Don't worry if the dough tears a bit - it can be pinched back together or just left as is - as long as it covers the top and is not hanging over the edge of the pan. Gently press it down with your fingers.

Brush the remaining 1 Tablespoon of liqueur over the dough.

Return the pan to the oven and bake the bars for another 30-35 minutes, or until the top is lightly golden. Remove the pan to a wire rack.
Cool thoroughly and then cut into brownie-sized bars. 
Cover and refrigerate any leftovers.

I've never tried freezing these as they've never lasted long enough!

Enjoy!
dn

Sunday, October 23, 2016

A Late Autumn Walk In Henteleff Park

Fall has always been my favourite season. The bounty of the harvests. The mouth watering aromas of foods cooking and baking. The scent of wood smoke and the crunch of leaves under your feet as you walk. Mother Nature pulls out her magic paintbrushes and the landscape is awash in spectacular colours!

For the last few years, one of my gal pals and I have made it a tradition to go for an autumn walk. This year, we were looking forward to a walk in Henteleff Park. We had both heard CBC's Terry MacLeod raving about how wonderful the park was and we wanted to explore it!

We planned on going early in the first week of October. The weather cooperated but as so often happens, life had other plans and we had to cancel. Over the next couple of weeks, wind and rain took down a lot of the leaves but we still wanted our autumn walk!

Weather and schedules finally cooperated on Monday October 17. It was mostly sunny with a few light clouds, a light breeze and the temp was 14C/57F!  

Once we arrived at the park (1964 St Mary's Rd) we stopped to look at the information at the newly opened Interpretive Centre and check out the trail map on the welcome sign.
As yet, there is minimal signage along the paths but more will be added as the Henteleff Park Foundation continues to work on its many goals. Even without signage, it is still fairly easy to find your way around on the various trails.

The trails themselves are well groomed. We didn't encounter any tree roots or fallen branches on any of the paths. They are all fairly level with minimal incline/decline in certain areas - but nothing steep. Despite some rain the night before our walk, we encountered only a couple of spots where there were puddles or a small amount of mud on the paths. The rain also pretty much took away the sound of leaves crunching under foot but that certainly didn't dampen our enjoyment of the walk!

Walking along the various trails in Henteleff Park, it is very easy to forget that you are still in the city. It is truly an urban oasis of rustic country beauty! From the moment we stepped onto the trails we felt as if we had been whisked back to the time of early settlers on the prairie landscape with a wide variety of grasses, plants and trees.

Granted, there are a few areas along the outer paths where you can see modern development of homes and apartment blocks bordering the property and the occasional sound of an airplane overhead but that does not detract from the atmosphere.

There is a simple wooden fence that separate some of the prairie grasses from the paths along the first part of the trail. It wasn't hard to imagine early settlers building that type of fence and watching various animals or their livestock munching on those grasses.

The park is home to several species of birds and animals including deer and red foxes. We didn't see those, although my friend got a brief glimpse of a beaver along Normand Creek.

A variety of benches are spread out along the trails. There is a simple old style wooden park bench as well as more elaborate stone benches - one even has a polished surface! They truly add to the uniqueness of the park as do several large colourful stones at the entrance.
I kept thinking of my parents as I walked through the park. They devoted a lot of time to landscaping our farmyard and also did a lot of stonework. They'd have loved Henteleff Park!

Before we left the park, we went back to the Interpretive Centre to look at some of the information again. Sitting on a bench, were two gentleman in conversation. My friend recognized one of them from photos she'd seen online. It was Yude Henteleff himself! We hesitated on whether or not to interrupt but decided we would just say hello and tell him how much we had loved our walk in the park. As it turned out, the gentleman he had been talking with was from the city parks department. Both were pleased to hear our comments!

The park that was once his family's homestead had come oh so close to becoming yet more urban development. Thankfully wiser minds prevailed and the land was rezoned to be developed as a park. The area is rightly named in honour of the Henteleff family. Yude Henteleff and a tireless band of volunteers have dedicated countless hours to creating one of the most beautiful and rustic areas one could ever imagine! They have many short-term and long-term goals yet to accomplish in order to ensure that this spectacular acreage remains for generations to come. I've no doubt they will succeed and am truly grateful for the determination and foresight of the foundation.

Needless to say, we enjoyed our afternoon! Time with a great friend. The weather was perfect! The colours were spectacular! Walking along scenic paths that seemed to transport us back in time and meeting the man whose family worked the land. We could not have asked for more!

I took a lot of photos as we walked. Being legally blind affects how I take my photographs. I'm drawn to the colours and the contrasts in shapes but don't see the finer details. I take a lot of photos on any given walk. Depending on the surroundings I often take 3 or more shots of a similar scene so I'm pretty much guaranteed of getting the pic I really wanted. The LCD screen on my camera is only 3" so I don't really know what I've got till I get home and view it on my 19" computer screen. When I'm reviewing the pics on the PC, I'm always pleasantly surprised to see things in more detail that I hadn't realized were even there. It makes me appreciate the beauty of the season even more!

I've put together a slideshow of the photos I took on our walk. The accompanying music is called "Canadian Waltz" by Mark Howard and is from his album "Old Time Reunion". Watch the video here.

- dn

Sunday, September 4, 2016

Roasted Almond Chocolate Bomb Cookies

Well, this self professed chocoholic has struck again!

I honestly thought I had a recipe for something like this already but after searching my recipe files - both on the computer and on paper - I realized that I didn't have a Chocolate, Chocolate Chip and Almond Cookie that used sour cream as one of the main ingredients!

The idea came to me while reading a culinary mystery by Joanne Fluke. The lead character, Hannah Swensen, is the owner of a small town bakery/coffee shop called "The Cookie Jar". She is a creative baker with a wide variety of recipes and also solves murders on the side! The author - Ms. Fluke - is also very generous in sharing many of her (and Hannah's) recipes in each book.  It should also be noted that the Hannah Swensen mysteries really must be read in sequence to fully appreciate the various character developments and ongoing storylines

In the novella - "Candy For Christmas" - there is a recipe for "Chocolate Mint Softies" that looked interesting. The recipe can also be found in "Joanne Fluke’s LAKE EDEN COOKBOOK". (Okay, a lot of the recipes in this series look interesting and it is really hard to resist drooling on my Kindle, but today I'm taking about this particular one!).

There were however some things I decided to change to more accurately suit my tastes. I'm not a huge fan of mint. I prefer it in toothpaste or breath fresheners but very sparingly in my food. I rarely have any unsweetened chocolate baking squares in my pantry and pecans are too expensive. I also didn't want to frost the cookies after they'd cooled.

So, I did a recipe search for Sour Cream Chocolate, Chocolate Chip Cookies. I was specifically looking for ones that didn't use chocolate squares. As expected, I found many but settled on one from Taste Of Home.

I did a side by side comparison of ingredients that also included the direct substitute for unsweetened chocolate squares:
   3 level tablespoons unsweetened cocoa powder 
+ 1 tablespoon butter, margarine or shortening
= 1 ounce unsweetened baking chocolate

After a bit more ingredient and measurement tweaking, I came up with a draft recipe to try.

I used block margarine rather than butter (butter may taste better in baking but it 's too costly for my budget!). I added 1/2 cup (8 Tablespoons) of unsweetened cocoa powder rather than the 6 Tablespoons from the direct substitute but also upped the margarine by 2 Tablespoons. I did a 50/50 split of all purpose and whole wheat flour. I swapped out the peppermint extract for almond extract and the pecans for roasted almonds. I also added chocolate chips as one can never have enough chocolate!

The batter came together well and the dough was quite thick as I added the last of the dry ingredients. This recipe works best in a stand mixer. If using an electric hand mixer, you will need to take a few breaks while adding in the dry ingredients so as not to overheat and/or burn out the motor.

Once the dough is mixed, it is quite sticky which makes it a bit hard to work with for dropping onto baking sheets, so it is best to chill it for an hour or two first.

Hopefully Ms. Fluke (and Hannah) would approve of this recipe!

I took samples of the cookies to several friends for tasting and they loved them! I also asked my friends if they had any name suggestions. The best one I got was "Roasted Almond Chocolate Bomb Cookies". I asked what had inspired the name. My friend said the cookie was soft and when they bit into it, there was the immediate flavour burst of chocolate and almond but when you bit into a chocolate chip the flavour just exploded!

Now, while your reading the recipe and making these cookies, I'm going to grab a couple of cookies and start reading another Hannah Swensen mystery to see what she's baking up this time and what is happening with the good folks in Lake Eden!

Roasted Almond Chocolate Bomb Cookies
3/4 cup chopped almonds, roasted
1 cup all purpose flour
1 cup whole wheat flour
1/2 cup unsweetened cocoa powder
1/2 teaspoon baking powder
1/2 teaspoon baking soda
1/2 teaspoon salt
1/2 cup + 2 Tablespoons block margarine, softened to room temperature
2/3 cup brown sugar, firmly packed
1/3 cup white (granulated) sugar
1 large egg (at room temperature), beaten with a fork
3/4 cup light sour cream
1 teaspoon vanilla extract
1/2 teaspoon almond extract
1 1/2 cup dark or bittersweet chocolate chips

Line a baking pan with parchment paper and spread the almonds over the paper. Roast in a preheated 350F oven for about 5-7 minutes - stirring at least once or twice during that time. 
Note, that these can go from perfectly roasted, golden brown to burnt in a matter of seconds so DO NOT walk away or get distracted. Remove the pan from the oven to a cooling rack and allow to cool completely before adding to the dough.

While the almonds are cooling, combine the flours (do not sift or pack the flours), cocoa powder, baking powder, baking soda and salt in a medium bowl. Set aside.

In the bowl of a stand mixer fitted with the paddle attachment, combine the softened margarine and sugars till very creamy. Add the beaten egg and extracts. Combine thoroughly.
Mix in about 1/3 of the dry ingredients.
Mix in about 1/2 of the sour cream.
Add about another 1/3 of the dry ingredients and mix.
Add the remaining sour cream and mix.
Add the remaining dry ingredients and mix thoroughly.
Scrape down the sides of the bowl to ensure all ingredients are well mixed. Add in the roasted almonds and the chocolate chips. Mix in completely. Dough will be a bit stiff and very sticky at this point so too frustrating to drop evenly on baking sheets. Transfer the dough to a smaller bowl, cover with plastic wrap and refrigerate for an hour or two. (Overnight is also fine but no more than a day)
Preheat oven to 350F. Line baking sheets with parchment paper.

Drop dough by teaspoon on parchment lined baking sheets. These spread very little so flatten slightly for more even baking.
Bake at 350F for 9-11 minutes. Note: When the cookie dough is so dark, it can be really hard to tell when they are fully baked - the cookies are done when they have risen slightly and are firm around the edges. DO NOT OVERBAKE! Carefully slide the parchment paper and cookies to a cooling rack to cool completely. 

Makes about 6 dozen scrumptious cookies depending on size.

Note: The taste testers and I agreed that these are best eaten slightly warm or within a few hours of baking as the chocolate chips are still very soft and you get a more intense flavour burst with each bite. If eaten later, then warm them in the microwave for a few seconds first. That way the chocolate chips are softened and just explode with the flavour when you bite into them. That being said, these can also be frozen, however they should be thawed and warmed slightly before eating - about 6-8 seconds in the microwave should do it.
Enjoy!
dn

Sunday, July 17, 2016

dn's No-Bake Chocolate Cheesecake Squares

A couple of weeks ago, I saw a tweet from Grant Melton who is part of the culinary production team on The Rachael Ray Show - and baker extraordinaire! He was doing a no-bake dessert segment on the show that day and asked what your go to summer sweet was.

I was going to just send a link to this recipe - then realized that I had yet to put it on the blog! OOPS!

So, I just gave a brief description. He liked the idea so much, he retweeted it!

For me, this is a go to recipe almost any time of the year. It's simple to make, can (and should) be made ahead - except for adding the fruit on top!) and isn't nearly as expensive to make as a full out cheesecake! It's also a bonus that I almost always have all the ingredients on hand!

I've been making this recipe for well over 20 years. I don't recall exactly HOW or WHEN I came up with the basic idea. However, I do recall that I started playing with this idea after a few attempts at making cheesecake. I tried several so called "can't fail" recipes. The baked ones used a lot of cream cheese, eggs and cream. No matter how careful I was, they always fell. The non baked ones also used a lot of cream cheese, cream and usually unflavoured gelatin - an ingredient I've never had any luck using!

Let's be honest here - as delicious as cheesecake can and should be, it is also expensive to make! By the time you buy all the cream cheese, cream and whatever other ingredients the recipe calls for, you feel like you've made a financial investment. If it doesn't turn out, it feels like a waste of time and money! Not to mention it can look really bad when you try to serve it to even the most forgiving and understanding of family and friends!

I figured there had to be a simple way to replicate a cheesecake like dessert without all the expense and worry of how it would turn out! It took a few tries to figure out what ingredients to use, get the quantities to the right proportions and the method to the point where there weren't hunks of chocolate in the cream cheese - though that wasn't so bad either - but I just wanted a really dark creamy chocolate cheesecake on a chocolate crumb crust!

Well, eventually my attempts paid off and I had my No Bake Chocolate Cheesecake Squares! 

Over the years, I've also developed some other no bake desserts including: Orange And Chocolate Cream Pie; LemonCloud Pie; No Bake Chocolate And PBSlice and some variations to Janet & Greta Podleski's Jollygood Squares. You'll find those and just over 100 other recipes in a variety of categories on my recipe index! (Or you can just click on the pic of Sylvester wearing the chef's hat on the right side of the page.)

dn's No-Bake Chocolate Cheesecake Squares

8 ounces bittersweet or dark chocolate
1 1/4 cup chocolate cookie crumbs
1/4 cup block margarine
8 ounces (250 gram) light cream cheese, softened to room temperature
1/2 teaspoon almond extract
1 Litre (4 cups) light, whipped topping, thawed

Spray a 8" square pan with nonstick cooking spray such as Pam. Set aside.

Place the chocolate in a microwave safe bowl. (NOTE: I generally use chips but if using squares or large pieces of chocolate, I cut them into smaller pieces first for more even and faster melting.) Melt on medium power for about 2 - 2 1/2 minutes, stirring after a minute then every 30 seconds or till the chocolate is completely melted and no lumps remain. Set aside to cool a bit before adding to the recipe.

Place the cookie crumbs in a small bowl. Place the margarine in a microwave safe bowl and melt on medium power in microwave - about 45 seconds depending on how cold the margarine is and the power of your microwave. Add the melted margarine to the crumbs and mix thoroughly. Spread the mixture evenly over the bottom of the prepared pan. Lightly pack the crumbs with the back of a fork or spoon to form an even, slightly firm layer (Don't press in too firmly or the crust will be rock hard and difficult to cut once chilled.) Place the pan in the fridge so the crust can set while you prepare the filling.

Cut the cream cheese into small pieces and place in a medium sized bowl. (NOTE: Cutting into smaller pieces makes it easier for the mixer to whip the cream cheese as it isn't trying to work with one giant piece.) With an electric mixer, whip the cream cheese to light and very creamy. Mix in the almond extract. Add the cooled, melted chocolate and mix thoroughly with the cream cheese. Don't worry if there seems to be some tiny amounts of solid chocolate. It is most likely just the difference in temps between the chocolate and the cream cheese!

Blend the thawed whipped topping into the chocolate cream cheese combo and mix thoroughly. Pour the creamy mixture over the cookie crust and spread evenly. Chill several hours or overnight before serving.

To serve: Cut into 8 or 9 pieces and add a topping to individual servings if desired. Topping suggestions: toasted almonds; sliced strawberries; fresh fruit salad; fruit preserve.

Cover and refrigerate any leftovers.

Variations:
- Add 2 Tablespoons of toasted almonds to the crust mixture (reduce cookie crumbs to 1 cup plus 2 Tablespoons)
- Switch out the almond extract for vanilla or orange.
- Sprinkle some toasted almonds, cookie crumbs or finely chopped dark chocolate over the finished dessert before chilling.

NOTE: It is better to add any fresh fruit or preserves to individual servings rather than to the top of the entire dessert as the fruit can get soggy and not look nearly as nice if left sitting for awhile.

Enjoy!
dn

Sunday, June 12, 2016

Garlic And Caramelized Onion Hummus

I make hummus throughout the year but especially enjoy it in the summer. It is the perfect way to enjoy healthier snacks or even as a full meal. When I know the weather forecast is going to be too hot to turn on the oven for a few days, I often try to make up a recipe of hummus and maybe some pita chips a day or so before the heat really sets in. Then, when it is hot. I'll cut up a bunch of fresh veggies, add some crackers or pita chips and a big scoop of hummus in the middle of the plate to enjoy for my lunch or dinner! YUM!

A few years ago, I came across a recipe for "Lick The Bowl Clean Hummus" on Taste Of Home. It had lots of onion, garlic and lemon in it and sounded like a great flavour combo to me!
I don't make a lot of recipes where I have to caramelize the onions. I love the taste of them but it is a process that must be done slowly and stirred often to truly get the best flavour. Sometimes, I just don't have the patience to go through that process no matter how good the end result! That being said, I made an exception for this recipe and I'm glad I did!
Naturally, I made a few changes along the way!

The original recipe called for 2 large sweet onions such as Vidalia. They are a fair bit more expensive, so I used medium cooking onions which I almost always have on hand and added a bit of brown sugar once they started to cook. When the onions were done, I transferred them to the  bowl of the food processor to cool while I deglazed the pan with the lemon juice to make sure I got every morsel of yummy flavour! I added lemon zest for extra oomph.

Speaking of the lemon juice, the original recipe called for 1/4 cup plus 2 Tablespoons which is actually 6 Tablespoons in total. Normally, I love lemon in my hummus but this amount seemed to overshadow the onion and even the garlic. The next time I made it, I reduced the amount of the juice to 4 Tablespoons and added the zest for a much better balance in flavours.

Some hummus recipes recommend roasting the garlic as well. I guess I could have, but frankly I love the taste of garlic so went with the fresh garlic! If you aren't as fond of garlic as I am, you could roast it, toss it in with the onions for the last minute or so of cooking or just add less - the choice is yours.

The other change I made, was to cut back on the olive oil. The original recipe called for 1/4 cup to caramelize the onions in plus up to 1/3 cup added while processing the hummus to the desired consistency. I felt that was way too much oil - even for something as healthy as extra virgin olive oil. So, I used 2 Tablespoons while cooking the onions which was more than enough and an additional 2 Tablespoons in the processing for a total of 1/4 cup. I replaced the additional olive oil with water as needed to get the right consistency - thick but not runny yet easy to use as a dip or spread. I generally add about 1-2 Tablespoons but it can vary from batch to batch so add a little then process a few seconds and add more if needed.

Tahini tends to separate so be sure to stir it well - making sure to dig down to the bottom of the container and along the sides to get the paste and oil to combine thoroughly before measuring. Store opened containers of Tahini in the fridge for up to a year.

This is a very flavourful hummus. It is strong in taste with a bit of a bite thanks to the fresh lemon and raw garlic but goes well with crackers, pita chips and raw veggies.. If you aren't big on lemon, you could use half lemon juice and half water but I'd still recommend adding the zest! I also highly recommend that you make this the day before you wish to serve it as it allows the flavours to blend even more and mellow just a touch!
If you want to make your own Pita Chips, the recipe is included at the bottom of the post for Lemon Basil Garlic Hummus. You may also like my Sweet Potato Hummus and my Roasted Red Pepper And Cashew Hummus.

Garlic And Caramelized Onion Hummus
3 medium onions quartered lengthwise then thinly sliced (about 3 1/2 - 4 cups)
1/4 cup extra virgin olive oil, divided
1 1/2 teaspoons brown sugar
1 can (540ml/19ounce) chickpeas, drained and rinsed
I large or 2 small lemon(s)
4-5 garlic cloves, chopped (about a Tablespoon)
1/4 cup tahini
1/8 teaspoon salt
1/8 teaspoon pepper
Baked pita chips, crackers and/or assorted fresh vegetables

In a large skillet, sauté onions in 2 Tablespoons of olive oil over medium heat until softened. Stir in the brown sugar and combine to coat. Reduce heat to medium-low; cook uncovered, stirring occasionally, for 30-40 minutes or until deep golden brown.
Meanwhile, zest the lemon(s) - you should get about 1 Tablespoon zest. Set aside. Juice the lemon(s), removing seeds and measure. If you have less than 4 Tablespoons top it off with some bottled lemon juice or add water to make up the difference.

Once the onions are caramelized, turn off the heat and transfer the onions to the bowl of the food processor to cool. While they are cooling, pour the lemon juice into the skillet and stir just enough to deglaze the pan. Pour the lemon juice and drippings into the food processor with the onions.
When the onions have cooled completely, add the chickpeas, lemon zest, tahini, garlic, salt, pepper and 2 Tablespoons olive oil. Cover and pulse for a few seconds - repeat 4 or 5 times then process until smooth - about a minute or so depending on the power of your processor. If the hummus is too dry, add a little water - a teaspoon or so at a time and process to desired consistency. (I generally end up adding about 1-2 Tablespoons but this amount can vary depending on your ingredients and how thick you want your hummus to be.)

Transfer the hummus to a container and cover. Refrigerate several hours or preferably overnight before serving to allow the flavours to blend more and mellow ever so slightly.
Serve with crackers. pita chips and/or raw veggies. Yield2-1/2 cups.
Enjoy!
dn

Sunday, April 24, 2016

dn's Chocolate Carrot Cake

Back in October of 2010, I shared myCarrot Cake recipe - which was a kicked up version of Janet and Greta Podleski's "Must Bake Carrot Cake" from their "Crazy Plates" cookbook.

Recently, I decided to up the ante on this one just a bit more! I decreased the flour ever so slightly and added some cocoa powder. There was only so much flour I was willing to risk removing, so to offset the additional wee bit more dry ingredients, I decided to add a bit of the pineapple juice to keep it nice and moist. This time, I also toasted the almonds that went into the cake batter - not just the ones for garnish!. The basic icing recipe is the same except this is the chocolate version of it!

As with the previous version, I made it in two 8 inch square pans rather than one large 9”X13” pan. Generally, I tend to find that the center always takes too long to bake thoroughly using the bigger pan. By doing it in two pans, it also spreads the cake more evenly and you get a more even consistency in texture.

The result was a decadently flavourful and moist cake that really made my taste testers happy! They loved it!

It's not completely guilt free but it is lighter than many of the other carrot cake recipes out there that are loaded with sugar, oil and cream cheese frosting but I swear this one is worth the effort and is totally splurge worthy!

dn's Chocolate Carrot Cake
Cake:
1/2 cup raisins
2/3 cup chopped almonds, toasted
3/4 cup buttermilk*
1 1/3 cup all-purpose flour
1 cups whole wheat flour
1/2 cup cocoa powder
2 teaspoons cinnamon
1 1/2 teaspoons baking powder
1 1/2 teaspoons baking soda
1/2 teaspoon salt
1 1/2 cups packed brown sugar
1 cup drained, crushed pineapple (A 540ml/19oz can is the perfect size here. Drain the pineapple over a strainer and reserve juice - some for cake and rest for other uses)
2 Tablespoons pineapple juice
3 large eggs, at room temperature
1/2 cup unsweetened applesauce
1/3 cup vegetable oil
2 teaspoons vanilla extract
3 cups freshly peeled and grated carrots
1 1/2 cups dark or semi sweet chocolate chips

Preheat oven to 350F. Spray two 8 inch square baking pans with nonstick cooking spray and set aside.

Place the raisins in a shallow bowl and cover with hot (but not boiling) water. Stir to separate any raisins that may be stuck together then allow to soak in the water for about 15 to 20 minutes. Drain water off and place raisins on paper towel. Cover with another paper towel and pat to remove access moisture. Soaking the raisins before using allows them to plump up for a better, fresher flavour and texture. (Note: I generally keep at least 1/2 cup that I've pre-soaked and towel dried in an air tight container in the fridge. They will stay good for up to a month that way so are ready for baking, salads or a snack.)

While the raisins are soaking, chop the almonds for the cake and also for the icing (see below for icing recipe) - that's 2/3 cup for each so 1 1/3 cup in total. Line a baking sheet with parchment paper. Spread the chopped almonds in a single layer and toast in preheated oven for about 5 to 7 minutes - stirring at least once or twice to prevent burning. When the almonds are a nice golden brown and have a fragrant, nutty aroma. remove pan to a cooling rack and allow to cool before adding to either the cake batter or top of icing.

* If you don't have buttermilk, place 2 1/4 teaspoons lemon juice in a measuring cup and add enough milk to make 3/4 cup. Stir and then let stand for about 5 minutes before adding to the recipe. Continue measuring and preparing other ingredients while it sits.

In a medium bowl, combine flours, cocoa powder, cinnamon, baking powder, baking soda and salt. Set aside.

In a separate bowl, combine the almonds, raisins and chocolate chips with about 1 Tablespoon of the flour mixture and set aside.
In a large bowl, whisk together brown sugar, pineapple, pineapple juice, eggs, buttermilk, applesauce, oil and vanilla. Stir in grated carrots.
Add flour mixture to carrot mixture and stir until well blended. Stir in almonds, raisins and chips.

Divide batter evenly into prepared pans. Bake for 30 to 35 minutes, or until a toothpick inserted in center of cake comes out clean. (I generally test in two or three spots near the center to ensure the cake is fully done as it is all too easy to mistake melted chocolate chips on the toothpick as raw batter!) Set pans on a wire racks and cool cakes completely before icing.
While cakes are cooling, prepare the icing.

Icing:
2 1/2 Tablespoons All Purpose Flour
1/2 cup milk
1/2 cup white sugar
3 Tablespoons cocoa powder
1/2 cup block margarine, softened
1/8 teaspoon salt
1 teaspoon vanilla extract
1/2 teaspoon almond extract
1/2 teaspoon orange extract
2/3 cup chopped, toasted almonds for garnish

In a small pan combine the flour and milk till smooth. Stirring constantly, cook over medium low heat until a very thick paste is formed.  Remove pan from heat and transfer paste to a small glass dish. Cover with plastic wrap or a plate and allow to cool completely – at least 20 minutes.
In a medium sized bowl, combine the margarine, sugar, cocoa powder and salt with an electric mixer until well mixed. Add in the vanilla, almond extract and orange extract then mix thoroughly. Add in the cooled paste and then beat on medium high speed until very light and fluffy. (This takes about 10-15 minutes on about level 5 or 6 of my Kitchen Aid 9 Speed Electric Hand Mixer.)
Divide icing over the two cooled cakes and spread evenly. Garnish with the toasted almonds.
Each cake will serve 8 or 9 - so 16 or 18 servings in all. Cover and refrigerate any leftovers for up to a week.
Enjoy!

dn