Late last fall, I came up with the idea for this recipe
and made it for a friend's birthday. It was quite tasty and enjoyed by all who
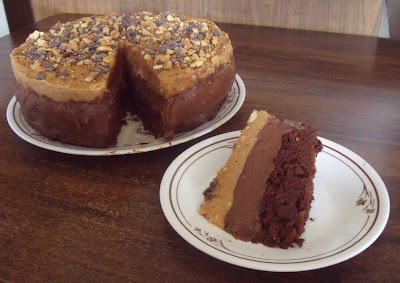
tried it - but I felt it needed a bit more work. I've made it three times since
and am now quite happy with the resulting refinements to texture and taste. It
is quite rich though, so a thin slice goes a long way to satisfying the taste
buds! All things in moderation!
The name is a bit deceiving... okay ,,,, a LOT deceiving! But when it comes to
chocolate and peanut butter there couldn't be a more delicious way to indulge
in a little sin!
How did it get the name? Originally, I didn't have a name
for it so I posted a pic. One friend (jokingly) asked what the nutritional contend
was. I replied that when it came to chocolate and peanut butter it was all
about the taste not nutrition! My friend then said that it was Vitamin
Sin!
The name was perfect!
 So, why not treat your family, friends, guests and of
course yourself to a little Vitamin Sin?
So, why not treat your family, friends, guests and of
course yourself to a little Vitamin Sin?

Vitamin
Sin!

Brownie
Base
3/4
cup all-purpose flour
1/2
teaspoon baking powder
1/2
teaspoon baking soda
1/2
teaspoon salt
1
cup granulated white sugar
1/3
cup unsweetened cocoa powder
1/2
cup margarine
1/2
cup water
1/4
cup light/reduced fat sour cream
1
egg. slightly beaten
1/2
teaspoon vanilla extract
1/3
cup chopped peanuts. roasted
Second
Layer:
200 grams/7 ounces dark or bittersweet chocolate (squares
or high quality wafers/chips work best)
1/2 cup crunchy peanut butter
1 250 gram/8 ounce light cream cheese, softened to room temp*
1 250 gram/8 ounce light cream cheese, softened to room temp*
1 4 serving instant chocolate pudding mix
1 300ml/10.5ounce can sweetened condensed milk
1/3 cup 1% milk
1/3 cup 1% milk
1/4 cup crushed peanuts (roasted)
1 cup frozen whipped topping, thawed (I used a
light, no name version)
Third
Layer
115 grams/4 ounces peanut butter chips
115 grams/4 ounces peanut butter chips
1 cup crunchy peanut butter
2 - 3 Tablespoons crushed roasted peanuts
3 cups frozen whipped topping, thawed
3 cups frozen whipped topping, thawed
Garnish
1/4 cup chopped peanuts and/or shaved chocolate for
garnish
Directions:
Base:

Prepare
a 9 or 10 inch spring form pan by ensuring the base and ring are properly
aligned and the lock is secure. Spray the inside of the assembled pan with a
non stick coating such as Pam.(Note: to make it even easier to later remove for
serving, I cut a circle of parchment paper to cover the inside bottom of the
pan then spray with cooking spray.)
Combine the flour, baking powder, baking soda, salt,
sugar and cocoa powder in a medium bowl.
Place the water and margarine in a microwave safe dish
and heat on medium power to melt the margarine. Allow to cool slightly. While
it is cooling combine the sour cream, egg and vanilla. Stir the water and
margarine into the dry ingredients mixing to combine. Add in the sour cream,
egg and vanilla and combine thoroughly. Stir in the toasted peanuts and stir to
combine. Pour into the prepared spring form pan and spread evenly.
Bake in preheated 350F oven for 20-25 minutes or till
toothpick test shows done. (With my oven, it takes about 22 minutes.)
Place the pan on a cooling rack and cool completely before continuing. (at least 1 hour!).
Prepare the second layer:

Break/cut
the chocolate into small pieces and melt with the peanut butter on medium power
in microwave for about 2 minutes - stirring after 1 minute. Stir till smooth
and set aside to cool.
With an electric mixer, beat the cream cheese, pudding mix, sweetened condensed milk and milk. Combine till smooth. Add the cooled chocolate and peanut butter and mix till smooth. Fold in the crushed peanuts and about 1 cup of dessert topping into the mixture. (I just estimated rather than measuring). Spread the cream cheese mixture over the brownie base. Carefully spread the mixture evenly and chill in fridge till firm - at least 30 minutes.
Prepare the third layer:

Melt
the peanut butter chips and peanut butter in a microwave safe dish on medium
power - about 1 1/2 - 2 minutes. Stir to smooth and set aside to cool for about
15 minutes. When it is cooled to room temp (but not hardening) fold in the crushed
peanuts and remaining 3 cups of dessert topping and mix to combine thoroughly.
Spread evenly over the second layer. Return to fridge to chill for at least 30
minutes.
Garnish with chopped peanuts and/or shaved chocolate. Refrigerate at least 4 hours or overnight.

To serve - Run
a knife carefully around the outer edge of the dessert to loosen from the
spring form pan. Release the spring and remove the outer ring. Gently run a
knife under the parchment paper liner on the bottom of the brownie base to
ensure a clean removal. Carefully slide the dessert onto a serving plate to cut
and serve.

Serves
12-16.
Note:
This dessert can be frozen in whole or in part. Wrap whole or a portion in
plastic wrap (double layer) and placed in a zipped freezer bag and store in
freezer for up to 2 months. To thaw: Remove the plastic wrap and transfer
dessert to a serving plate and cover with plastic wrap. Place in fridge for
several hours then slice and serve.
*
During the holiday season, you can often find chocolate cream cheese. If you
happen to find this, feel free to use it and reduce the chocolate by 1
ounce/30g for the second layer. I've made this both ways and either works well!
Enjoy!
dn